
{Thrifty Thursday} An IKEA Desk Makeover
I purchased an IKEA desk sometime ago and had visions of what I wanted it to look like dancing in my head. I decided on diagonal lines and wanted a pop of color.

So on the black brown surface I thought that yellow would look good…it ended up looking like a construction traffic sign. Oops! Lesson learned.

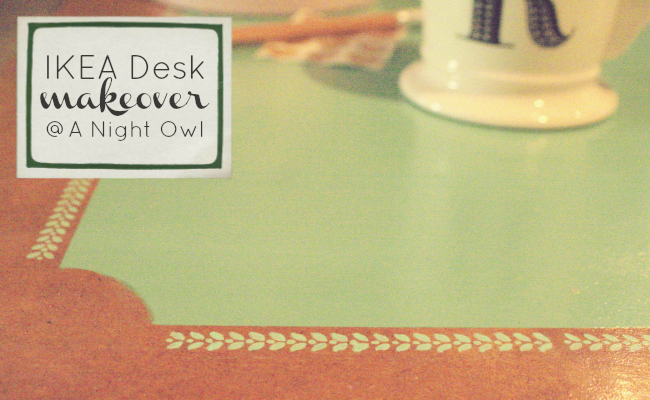
So I stripped the whole table down and was loving the earthy look of the particle board…which I’m sure might be a first of all time. LOL! I decided to go with a very simple, classic look and used mint colored spray paint I already had to create a desk blotter look. I created a rectangle center with paint tape and used cans of soup on the corners to create inverted circles. For a finishing touch I added the Fair Isle Dots Stencil by Martha Stewart with a mint multi purpose paint also from the Martha Stewart line.


The end result is a desk + space that inspires me to create + design + and dream up new projects. Do you have a DIY project that inspires you?
 Rachel of Just Us Three Design and Harding Family Happenings is a contributor for A Night Owl.
linked up here, tatertots & jello, the 36th avenue, tip junkie, i {heart} naptime, frugal girls, home stories a to z


Looks awesome!
Sarah thank you so much! It was a fun project!
Wow looks so mice!
Thanks! I think so too…even if it was the second try. 😉
That desk is adorable! Love what you did with it!
Niki thank you! I love the final outcome too!
I love this makeover – It looks great! And I love the paint color you chose as well 🙂
Thank you! I have a serious mint obsession right now….it’s a problem. LOL!
I love how this turned out!!!!!!!!!!! Perfect color too.
Yeah from yellow to mint. I ended with the right color I think. 🙂
That’s AMAZING! I can’t believe that’s the original particle board…and in my eyes you can never go wrong with mint. Looks great!
I know! I loved the raw look of the particle board. Just goes to show that various materials can look fab…doesn’t always have to be solid wood furniture to have that WOW!
Cute redo! Thanks for stopping by our Pretty Things Party. Hope to see you back next week!
Thanks so much!
WOW. That is an incredibly makeover. I LOVE IT!
Thanks for stopping by…I sure love it too.
When particle board turns out this attractive you can learn to love it. It was amusing to see the crime scene yellow and black and how you solved the problem.
Right?! I had to share! WHAT WAS I THINKING?! :op
I had to giggle at the bumble bee desk, this is much better, love it!
I know I can laugh it now but I SERIOUSLY considered pitching it after my first attempt failed. Glad I stuck with it.
this is so cute, love the stenciling! great job! 🙂
Thanks so much! It definitely added a sweet little touch! 🙂
It looks fantastic! I’m about to buy an IKEA desk for my studio, I’ll have to remember this!
Oh yes for sure! And bonus….you can learn from my initial mistake and only have to paint once. ;)Hehe!
I love this! You did a fantastic job. 🙂
I really appreciate that! Thank you! 🙂
WOw, so cute! I have a lot of IKEA furniture and have never taken the veneer all the way off before. I love your final look though! I came over from tt & J where you were linked up by me :o) I also host a Tuesday link party (Tastefule Tuesdays) and I would love for you to join sometime. It opens at 8:30 om central time.
Thanks so much! Yeah I was forced to sand all the way down thanks to my construction sign mess up! Haha!
Your desk looks fantastic – love the colours and the blotter look.
Thanks so much! Totally simple and classic…the perfect pair.
Love, love LOVE! Your desk makeover turned out great! Can’t wait to get a new desk to try this out on… 🙂
I featured your desk on my blog today, come on over and check it out: https://www.artsyfartsymama.com/2012/09/pinteresting-features-n-shtuff-51.html
Awesome! Thank you for the feature! Can’t wait to see it on your desk!
This is gorgeous! You did a fantastic job. This is a fantastic project! Would you consider linking this up at my Pinworthy Projects Party? I hope to see you there!
Totally please let me know if we can still link up. Thanks so much!
I’m sitting at my IKEA desk right now and I’m totally inspired by your beautiful job! This plain white desk might be getting a face lift. Thanks for sharing!!
You are so welcome! Can’t wait to see different versions of my desk out there! 🙂
I need to redo my old Ikea dresser drawers…I have NO clue how to much crafting, let alone with Ikea products that don’t seem very “paintable.” Mind sharing how you stripped it?? And also, mind sharing how you painted the desk originally? Did you need to sand it? Prime it? Please share, I have no idea what I’m doing and would hate to botch my furniture! Thank you so much!
Oops, I have NO clue how to do* much crafting 🙂 I’m a baby to this painting stuff and refurbing things!
So I originally used spray paint and painters tape. Laid down they stripes and sprayed away. I would recommend using a primer if you are painted a lacquer type surface. Since I didn’t like the bumble bee stripes I used a hand sander to take the whole finish off and start over. I went down to the particle board when sanding to get a nice smooth and even surface. Then again used painters tape {and used kraft paper to cover the edges of the desk I didn’t want to get paint on} to outline my blotter look and was lazy and used cans of soup for the inverted circle corners. LOL! Then used my stenciling along the edging and sealed it all with a clear coat. Voila! GOOD LUCK!
Thank you!! Mind if I ask one more question?? LOL. It is a lacquered finish, would any type of primer do? And any type of paint is usable also on a lacquered finish? Again, I’m a baby, need to learn so much about paints and surfaces!
It really depends on the type of finish you are doing over. I recommend taking a pic of your pieces and going to a home improvement store and ask the experts in the paint department. I’m actually a novice myself….as you can see this project had it’s bumps. Don’t be afraid to just go for it…you can always strip furniture down and start again like I did. I went with a sealer rather than a lacquer because lacquer is actually pretty pricey. I opted for an inexpensive can o clear glossy sealer. 😉 BEST OF LUCK Marie and thank you so much for stopping by! 🙂
I love how this has turned out, pinning this for later 🙂 stopping by via tip junkie
Thanks so much! Pinning is Winning! 😉
Wow it looks like a stylish desk mat. What a great transformation! Stopping by from Cherish Bliss – feel free to check out what I linked up this week.
Thank you so much. Yeah totally what I envisioned….well the second time around. Haha!
OMG…this is GORGEOUS! I LOVE the look of particle board too! 😉 I am speechless..this is just gorgeous!
Awh thank you so much! I was thrilled with the final outcome. 🙂
Oh soooo STYLISH!!!! Love the look!! Did you apply anything to your stencil work when you were finished?
Thanks so much for sharing this at The DIY Dreamer… From Dream To Reality!
I applied a sealer similar to Martha Stewart gloss enamel spray. https://www.michaels.com/Sprayable-Gloss-Enamel-Finish/cp0502,default,pd.html?start=8&cgid=products-craftpainting-finishes-marthastewartcrafts%E2%84%A2
Oh wow, I love the blotter! The colour is perfect and it looks so sweet, just lovely.
Debbie 🙂
Thank so much. The pictures don’t even do this piece justice which is the funny part…it’s still getting lots of love. Hehe! 🙂
What a great project! The particle board really does look good! Who knew?? I’m hosting a We Share Wednesday Link Party and would love for you to join in!
I know right?! It was a pleasant surprise. 🙂
Wow, I love it! The color is fabulous and those tiny stencils around the edge are too cute. Thanks for sharing at The Fun In Functional!
Thank you Jessi! We think it is lovely with the lil stencil border too.
I’m just stopping by to let you know that this desk was the most popular project from last week’s link party! Congrats! You can check out the feature and grab a brand new Featured button here: https://practicallyfunctional.net/2012/10/the-fun-in-functional-link-party-20/
Gorgeous!! Maybe that’s my problem. If I had a beautiful desk, I would love to look at it so much that I would never let it get cluttered. Hmmmm…
Haha! Right?! Thank you so much Shatzi! 🙂
Great makeover! I would love it if you stopped by and linked this up to my weekly link party. Hope to see you there! https://thelifeofjenniferdawn.blogspot.com/2012/10/a-little-bird-told-me-link-party-12.html
Thank you Jennifer! 🙂
Amazing job! I came here from Inspiration Friday.
Thank you so much Tina! It was lots of fun.
wow, what a big difference a little paint can make. so cute!
We’re starting back up our weekly link parties and I would love for you to stop by and link up. We are giving away a $25 gift card to Hobby Lobby to one lucky featured blogger too! 🙂
LOVE your desk makeover! Thanks so much for linking up to Do Something Crafty Friday!!
I love the way this turned out! I also just posted about a piece of Ikea furniture that I hacked, and then re-did a second time. I’d love if you checked out the post – https://newhousetohome.blogspot.com/2012/10/a-tale-of-two-malms.html
CONGRATS!!! You have been featured at The DIY Dreamer… From Dream To Reality!
Come on over and grab your feature button, you deserve it 🙂
https://thediydreamer.blogspot.ca/2012/10/from-dream-to-reality-linky-party-37.html
I am loving this! I need to find a desk for my 14 y/o too! Thx for sharing!
Oh my, your talent is so wonderful. I really love the desk. I have been wanting to buy something from the “Martha Stewart line.” Finances do not allow it now but I will write down what you used. Keep the tutorials coming. Lisa
I LOVE how this looks! Has working on a desk with that paint made it fade or scratch at all?
Love the newER look!! I have to agree, the yellow stripes were a bit much, although it would be cool in the proper decor. But I love the design you finally came up with. Beautiful!