
DIY Halloween Photo Backdrop
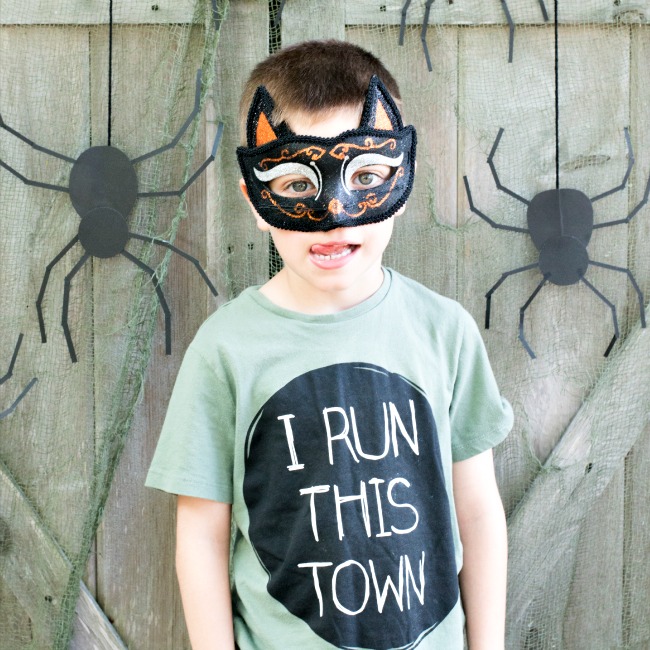
This Halloween, create a DIY Halloween Photo Backdrop for less than $5 to capture all those fun costumes and moments!

This photo backdrop was done for under $5! I am not kidding. Sure, I had some black craft paper on hand, and glue…but buying that creepy cloth (yes, that is what it’s called!), really added something fun. My kids even liked draping it over themselves and running around scaring us. Good stuff.
What you’ll need:
- creepy cloth like this one (but I found mine for $4.99 at Michaels!), and I actually think black would look amazing!
- black craft paper
- circle punch
- scissors
- glue
- black yarn
- gaffers tape (or whatever you’re fine with for taping to wall)
Make your spiders:
I like to make the body in two parts, and then assemble each leg in three pieces. This way you get that segmented look, bigger impact in my opinion. For the body, I made the back end kind of a tear drop shape (and this determining the size of the entire spider). Folding a rectangle of the craft paper in half so both sides are even (that trick hasn’t left me since learning it in elementary school!). Then for the front, just use a simple circle. I used a 2 inch circle punch for the bigger spiders, but cut them smaller for the little guys.

For the legs, I used a paper cutter to cut ¼ inch strips from the craft paper. You can do the same, or just a ruler and scissors will work too. Then you cut down to size for the leg segments. Each leg requires three segments, so that’s 24 segments per spider. Sounds like a lot, but it goes really fast! For my bigger spiders the segments are each about 1.5 inches long, and for the smaller guys 1 inch. Don’t over think this part though!

Once dry, you’ll be able to hang with the rest of the backdrop.

Use the gaffers tape to drape the creepy cloth against the wall (or I used the side of my shed!). Make sure it’s taped high enough to be out of the shot. I also needed to tape the sides down since the wind really wanted to blow it around!
Now, hang pieces of black yarn, one for each of your spiders (I made 5, but you do you). Hang at different lengths, leaving a bit of an open area where kiddos will stand. It helps to get some of your kids to stand there while you place these! Use the gaffers tape to tape the top end of the yarn, and you can move it around if you need to adjust later.
Use a small piece of gaffers tape to tape the other end of yarn to the back of each spider. Making the ‘web’ it will be hanging from. Once I liked the placement of the spiders, I added a bit of tape to the back of each spider to hold it against the wall.
Now, time for pictures!! I also think this could work really well as a window treatment, or backdrop to a food table. Take your pick!

Like it? Pin it!


Such a cute backdrop! This will be perfect for any Halloween party!
Paige